How to Replace Your Chainrings
Basic removal and installation instructions for 5-bolt chainrings on 3-sprocket systems.
This tutorial will demonstrate how to remove and install chainrings. Since there are so many different crank and chainring sizing combinations, I’ll stick to the basics and give a general overview of the process based on a 5-bolt, 3-chainring system.
For this job, you’ll typically need a 5mm allen key, a chainring nut wrench, and some waterproof grease. On some bikes, you may find it easier to remove the right crank arm before you begin.
Chainring Removal
Before removing the largest two chainrings you’ll often have to remove the smallest one, which is often threaded directly into your crank arm. Use your allen key to loosen all of the bolts that hold the chainring in place, and then use a marker to make a note of the chainring’s position in relation to the crank before removing it completely. Some chainrings have a bump sticking out that should be lined up with your crank arm.
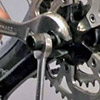
The largest two rings are usually bolted to each other with a nut and bolt. Here you’ll need to hold the nut in place with the special chainring wrench while you loosen the bolt with your allen key. Once again it’s a good idea to mark the chainring’s position in relation to your crank arm. The two largest outer rings often have a few spacers or washers in between, so be sure to note exactly how they came apart so they can be reinstalled correctly.
While it’s ok to install a new chainring that has a different number of teeth, you’ll want to make sure that your new chainrings have the same side profile as the old ones.
Chainring Installation
Before you reinstall the bolts, apply a thin layer of grease to the threads to keep out moisture. Now you can reassemble all of your chainrings the same way they came apart.
Make sure all of the bolts are finger tight and then begin tightening them evenly in a star pattern. Start by tightening the first bolt, and then every second bolt until you’ve gone all the way around. Repeat this process until all of the bolts are tight. Be careful not to over-tighten. Park Tools recommends 44-88 inch pounds of torque for aluminum bolts, and 70-95 inch pounds for steel bolts.
Related Links
Recommended Tools
- Shimano TL-FC20 Dustcap Pin Tool
- Park Tool HXS-1.2 Hex Wrench Set
- Shimano TL-FC10 Crank Extractor
- Park Tool PAW-12 Adjustable Wrench
- Park Tool SK-3 Starter Mechanic Tool Kit
- Park Tool PK-3 Professional Tool Kit
Categories
Discuss this topic in the Bicycle Repairs and Mechanics Forum
Headset overtightening
Latest post 17 hours agoI have a Fondriest and could not get the headset to tighten without over tightening and then it will not steer properly because of heavy drag on the bars. I replaced the headset with no change so I replaced the steel fork with s Hylix carbon fiber bar and another new heatset and pinch steering head lock. Still it wont adjust properly. it acts as if the bottom headset bearing is too deep in the cup...
Read moreRear hub issue
Latest post 17 hours agoI have a 10-year-old 105 rear hub, and one of the pawls is acting up, I cleaned it and relubed the hub pawls but it still won't engage as fast as it did, like one of the pawls isn't working. I think it might be time to get a new hub. I would like one that engages faster but don't want to spend the money for something like the DT Swiss hub, what recommendations do any of you have for a hub? Or i...
Read moreSpecialized expedition in need of repair
Latest post 17 hours agoHello I have recently pulled my 2005 specialized expedition out of the garage. It's in need of some repair due to it being damaged by super storm sandy. My shed was flooded with ocean water. The frame itself looks perfect but the moving parts have some rust. Including the fork, brakes, and gears. I'm just looking for replacement parts I have no intentions on buying a new bike. Please help than...
Read moreTyres keep popping off wheels...
Latest post 2 weeks agoHello guys Just bought a new pair of 700c hybrid wheelset with an inside rim width of 19mm. I have tried to fit schwalbe 700 x 40c tyres on them but the tyres just pop out from the rim when inflated. It seems to be a loose fit. Somebody please advise. Thanks...
Read moreWhat tools have you bought recently?
Latest post 2 weeks agoI'm slowly eliminated all LBSes in my area as options for servicing, LOL. The latest one has been struck off my list after watching, pained, their approach to removing the axle end caps from a hub with cartridge bearings. Suffice to say, I finally ordered a blind bearing puller kit and a bearing press kit. If you want something done properly, you have to do it yourself! Have you bought any nic...
Read moreModern rims crack at spoke holes
Latest post 2 weeks agoRecently, I was in one of the local bike shops. Someone had brought a bike back to have the back wheel re-trued. There were actually cracks in the rim, originating from the spoke holes. I have had the same problem with my bike. In past decades you could buy a bike, and the wheels were strong. With modern rims, the aluminum is getting thinner and thinner. Now the rims crack. With heavy riders, a...
Read moreAre all folding tyres made of Kevlar bead?
Latest post 3 weeks agoHello guys I understand cheaper regular tyres are made with a steel wire bead. But are all folding tyres made of Kevlar bead? I have just purchased a set of tyres as per attached photo and wanted to know if the bead is Kevlar. Can anybody please help? Thanks...
Read moreTire bead won’t seat into rim
Latest post 3 weeks agoI bought a Tamobyke V20. Both the front and rear tire beads slide off the rim when inflating much at all. How do I get them to sit in there where they belong? Pics attached ty!!! IMG_3164.jpeg (Size: 61.62 KB / Downloads: 42) IMG_3173.jpeg (Size: 46.46 KB / Downloads: 41) ...
Read moreThread busted on right pedal crank
Latest post 4 weeks agoHi Ive joined to specifically ask about a problem which may have been covered before Im sure. My right pedal broke so I had to replace it. Then had issues getting the new pedal to go on straight so I was riding with it slightly at a bend. But then it just came loose and fell off. Problem is now the thread seems busted and the pedal just slots in with no screwing needed because the hole is enlar...
Read moreCup & Cone — Simple & Durable or PITA & Outmoded?
Latest post 1 month agoCup and cone hubs have long been considered simple, durable, easily maintained, and reliable. Having messed around with a couple of older hubs tonight, I ended up looking at my sealed-bearing hubs with increased fondness. I'm wondering what other people think. Should we old farts just accept that modern hubs with cartridge bearings are the way forward?...
Read moreTrek domane tyre
Latest post 1 month agoHi I have a trek domane 2.3, and I have changed the rear tyre to 28 (it was 25 originally) The tyre rubs with the brake arm (v brake), I fear it doesn’t seem to be compatible Is there any way to adjust the position of the brake arm? I just need it to ne around 2mm higher Thanks...
Read moreFalling back
Latest post 1 month agoIn December of 2009 I had a first generation carbon fiber fork break on my road bike and it dropped me right on my forehead. This gave me a very serious concussion and both ER doctors and most neurologists do not take them serious. So it took about two years of my slowly dying since I couldn't even remember to eat before my Cop friend took me to a proper neurologist who diagnosed it as a concussio...
Read moreDerailluer Hanger Alignment Tool
Latest post 1 month agoI cannot express enough about the importance of this tool when having to deal with multi speed bicycles. I have been in the bicycle biz in one fashion or the other for over 30 years. Have sold many new bicycles and 90% have been out of wack fresh from the box. With used bikes crossing your path you should just expect it to be bad. And never string new cables without checking the hanger first, ever...
Read moreChain sits on top of chainring when shifting up
Latest post 1 month agoHey guys, First post here. I've tried searching, but I don't know what you call this. I have a vintage Schwinn Passage that I picked up a few months ago. At first it worked well, but recently it's been giving me trouble. When I shift, the chain pops into the higher (larger) gear, but then sits on top of the chain ring. What ends up happening is that the chainring will keep turning, and eve...
Read moreWTB Raddler TCS 40c, small cut - repairable?
Latest post 1 month agoWent to fix the slow leak on my gravel bike's rear tyre. Found the culprit: a small cut near the middle of the tyre. The good news is it gave me an excuse to order a pair of Panaracer 43c semi-slick GravelKings (most of my local rides are more road-focused) to try out. Meanwhile, I was considering ye olde vulcanised patch repair to the inside of the tyre and superglue to the outside, but I'm thi...
Read more